Today I will be bringing you a photo tutorial post of Chaussons Mignons. So first, I want to make it very clear that this pattern is not mine. I am simple throwing out some, hopefully helpful, instructions on assembly for a new knitter. Here is the Ravelry page for the pattern: Chaussons Mignons and a link to the designers blog: Pruline en Vadrouille.
Okay, so back story on all this. I made a pair of these as a baby shower gift along with a hat and some washcloths. I have a whole family of knitters and crocheters, some have been crafting longer than I've been alive and some are just starting out. One of my younger cousins is just starting out, so of course, I'm encouraging her to come to the dark side. She asked me about these booties, I told her it was a pretty good pattern for a beginner. I am doing a tutorial on the knitting and assembly mostly for her, but also for my other non-knitting readers in the hope that I can bring them to the dark side too.
I knit at a pretty tight gauge and I found that the booties knit from the original pattern are a bit small so these are the modifications that I made.
Cast on 34 stitches, leaving a 12 inch tail.
Knit 14 rows.
Bind off 12 stitches on each side so 10 remain.
Knit for 22 more rows and bind off leaving a 12 inch tail.
So, the first place I foresee confusion is the binding off of 12 stitches on each side. There are two ways this can be done. What I do, in order to minimize the amount of ends to weave in is this:
 Bind off 12 stitches and then knit to the end of the row. On the next row, bind off 12 stitches again, this will leave 10 in the middle.


 As I said I slipped the side stitches so that's why the edge and the bind off edge look the same. If you didn't slip the edge stitches just go though the single "peg" that is left between garter rows. (Whip stitch doesn't have to be perfect, its one of those seaming techniques that can be fudged pretty well). So finish up that seam and pull the remaining end to the inside for finishing.
 Now for the front and right side seams. The front is three layers so I usually treat two of the layers as one. In this case I held the bottom two layers as the bottom and the top flap as the top.

 Once finished with the front, keep on working down the right side. It will be back to two layers once you get to the side.

 Pull the end through to the inside and weave in the two ends.
 Trim off the ends and now you should have one complete bootie.
 Now, for the second bootie, do this all over again making sure the top flap is folded opposite from the first one. I'm going to run all the pictures of the second one all together.

 Left side seam.

 Front seam.

 Finished front and moving on to right side seam.
 Look at that, its a finished pair of booties! So that's it, nice and simple. Hope you all have enjoyed this photo tutorial. I will be back with another blog for all my update work. Happy Crafting!
-Q
Okay, so back story on all this. I made a pair of these as a baby shower gift along with a hat and some washcloths. I have a whole family of knitters and crocheters, some have been crafting longer than I've been alive and some are just starting out. One of my younger cousins is just starting out, so of course, I'm encouraging her to come to the dark side. She asked me about these booties, I told her it was a pretty good pattern for a beginner. I am doing a tutorial on the knitting and assembly mostly for her, but also for my other non-knitting readers in the hope that I can bring them to the dark side too.
I knit at a pretty tight gauge and I found that the booties knit from the original pattern are a bit small so these are the modifications that I made.
Cast on 34 stitches, leaving a 12 inch tail.
Knit 14 rows.
Bind off 12 stitches on each side so 10 remain.
Knit for 22 more rows and bind off leaving a 12 inch tail.
So, the first place I foresee confusion is the binding off of 12 stitches on each side. There are two ways this can be done. What I do, in order to minimize the amount of ends to weave in is this:


These 10 stitches are knit for another 22 rows, more if needed. Then bound off. The end product is a T shaped piece of fabric. Of course to make a pair of booties you'll need two of these so, repeat.

Voila two! I should note that I slipped the last stitch of each row purl wise to get a nice even edge. So, on to assembly.
The first thing I do is manipulate the flaps on each bootie to see which color(s) are going to show depending on which one is one top. I wanted orange to be the predominate color on the flaps so I did this:

I start on the left side and seam toward the back of the bootie first. I used the yellow end (left bootie, end on the bottom, end left from bind off...) I whip stitched these. That's my go-to for dishcloth seams and this pattern. There are some great YouTube videos for this, if unfamiliar.
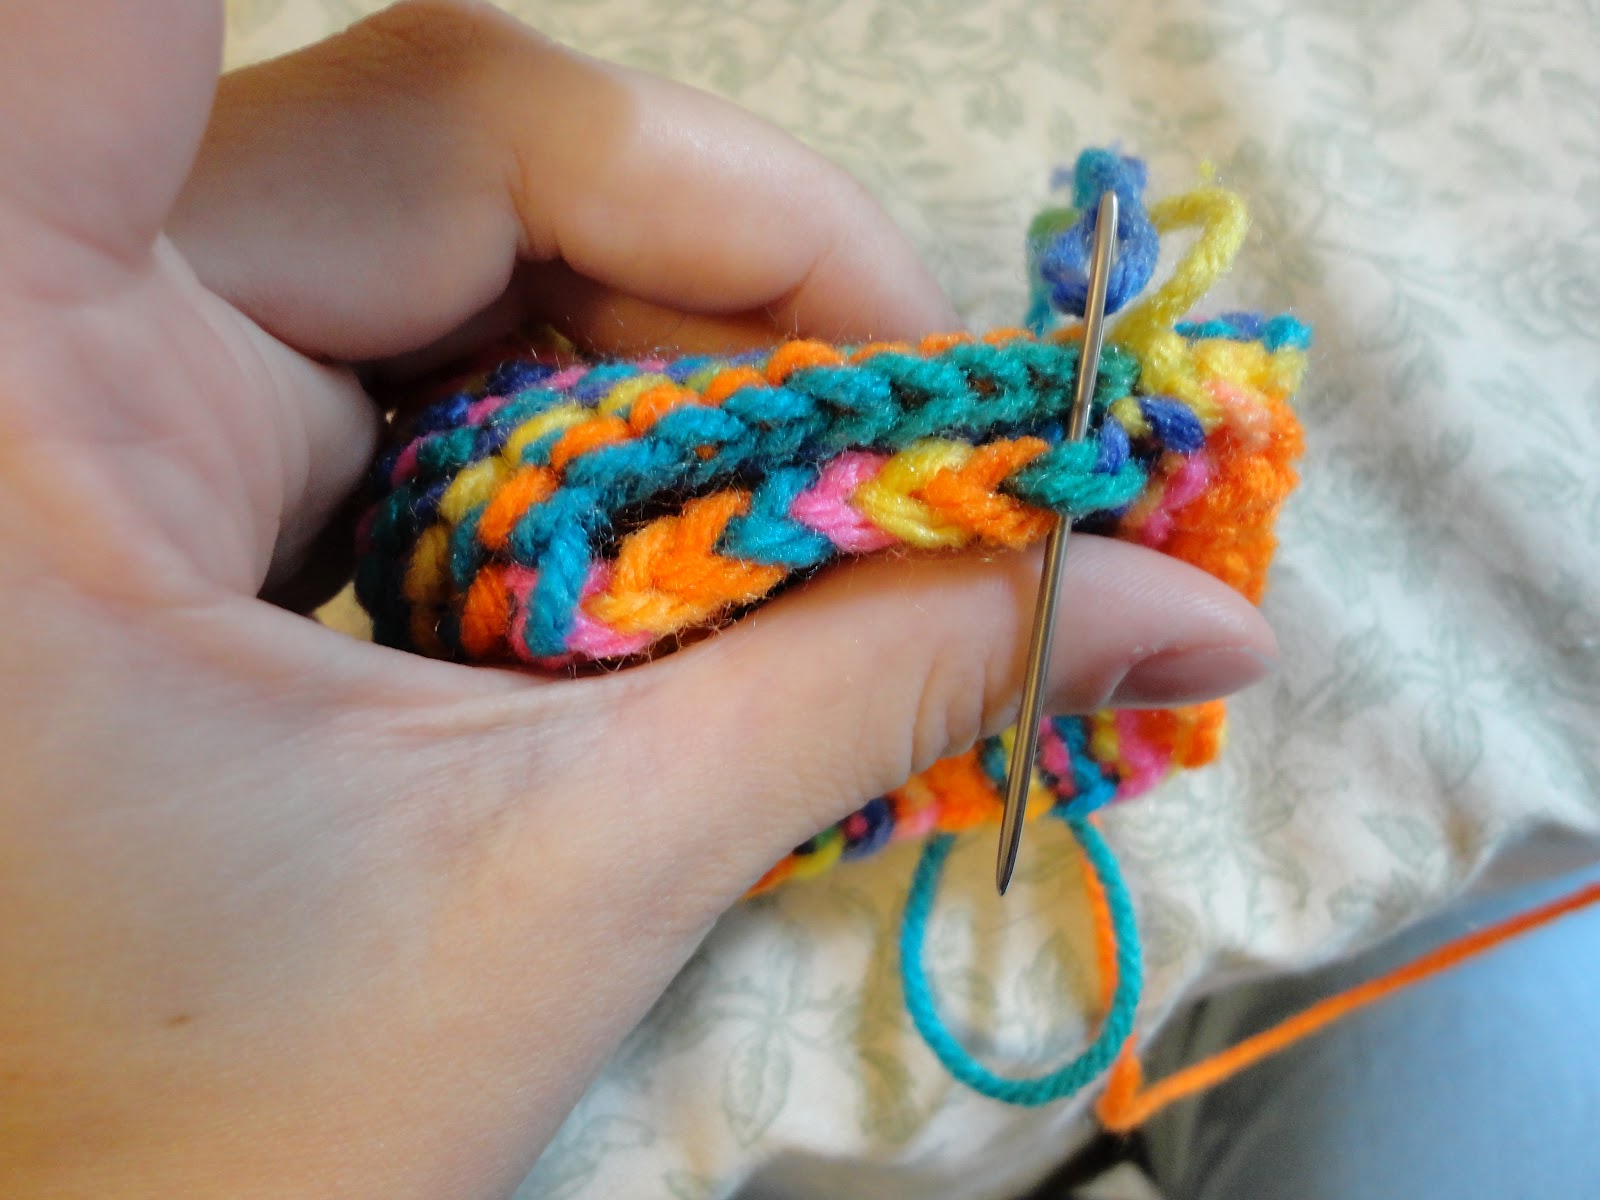
Here it is with a couple stitches done. When starting I run the yarn through all three layers at the starting corner. This tacks down the inside front flap. This side seam is done the rest of the way with just the two layers. The main thing about whip stitch is that you sew outward, away from the work, if that makes any sense. Notice the orientation of my needle. Here is the very next stitch:


-Q
Thank you SO much for putting this together!! Great job and such a big help. I feel confident that I can do this pattern now :)
ReplyDeleteI'm glad I could be of help!
Delete